Materials & Applications
Choosing Embroidered Fabric for a Blouse: Coverage, Openings and Balance
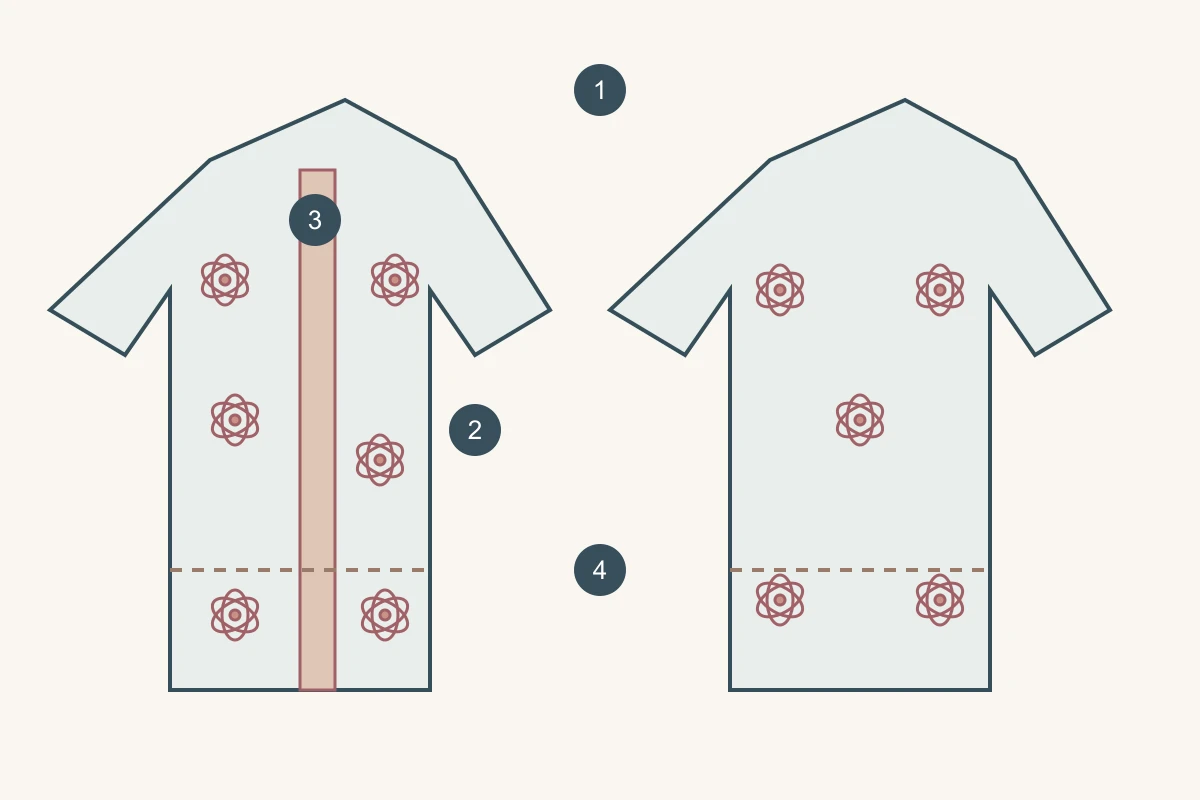
Choose embroidered blouse fabric by balancing the whole garment’s coverage, movement and opening arrangement. Start with a front-and-back garment sketch and the intended layer underneath, then compare decoration density across the complete silhouette. A blouse worn loose over a camisole needs a different layout discussion from one tucked into a skirt. Resolving that difference early gives the fabric shortlist a clear purpose.
Build a whole-blouse material plan
On one sheet, show front, back and side views, blouse length and whether it will be worn tucked, loose or both. Note which areas use the embroidered material and which use a companion fabric. A front-only reference can overlook a back panel that becomes visually heavier or more transparent than intended.
Put the actual inner garment or proposed lining behind the fabric and view the complete front at normal viewing distance. Keep its colour and neckline in the reference record. If the blouse will have no added inner layer, review that version separately rather than comparing it with photographs taken over different backgrounds.
Distribute decoration where it will remain visible
Mark focal areas, quieter areas and decoration hidden by folds or tucking. A large flower near the lower front may disappear when the blouse is tucked in, while the same motif placed higher changes the visual emphasis. Discuss which of those outcomes serves the design instead of simply requesting embroidery everywhere.
Compare a full repeat on the front and back sketches. Where the pattern includes gathers or pleats, show their finished positions over the motif map. This makes it easier to spot a flower divided between folds or a dense band concentrated into a small area. Review those locations in the trial garment, not only on the flat layout.
Pair the fabric with the opening
Select the front opening while choosing the embroidered material. A folded placket, separate plain band and concealed fastening each put different layers beside the embroidery. Threads’ sheer-placket tutorial shows a folded construction with enclosed raw edges; it is one useful structural reference, not a required construction for every blouse.
Make a small opening sample with the intended buttons or other fastening. Close it and inspect the visible overlap, motif interruption and contrast between the band and body. Decide whether decoration continues to the opening or stops beside a plain band. Record that boundary before placing the main front motifs.
Technical references
Use the wearing plan to compare options
Compare complete outfit versions on the same basis. The following table links three common wearing plans to distinct material decisions; it is a planning tool, not a ranking of fabric quality.
| Wearing plan | Main material question | Useful comparison |
|---|---|---|
| Loose over an inner top | Front/back visibility and length | Whole blouse over the intended inner top |
| Tucked into a skirt | Decoration above the tuck line | Same blouse loose and tucked |
| Open-front layering | Inside edge and front-band relationship | Open and closed opening sample |
Run a specific blouse trial
For a hypothetical blouse worn both loose and tucked, candidate A places a dense floral band near the bottom; candidate B spreads smaller motifs above the tuck line. Make front mock-ups using the same silhouette, inner layer and fastening. Photograph both styling modes and ask which decoration remains visible in each.
Suppose B is preferred when tucked, but the loose version loses the intended focal point. A targeted next trial could move one complete motif higher on the front while leaving the back unchanged. The next comparison then answers one clear question. This invented example illustrates a decision process and does not describe an All4Lace customer project.
Write a brief that preserves the chosen balance
Keep the garment sketch, fabric reference, repeat view, inner-layer reference and chosen opening sample together. Add the marked tuck line and any fold locations that affect the visible decoration. These records tell the next person why a particular fabric and layout were selected, rather than leaving only a cropped swatch.
Order discussions can then distinguish yardage for the blouse body from any separate bands, trims or lining. List those parts individually with their supply units. A later change from loose to tucked styling should return to the visibility map before the original layout is reused.
Discuss your embroidery project
Send All4Lace a front-and-back blouse sketch, intended wearing modes, inner-layer colour and opening reference. Include a full-repeat fabric preference and mark the decoration that should remain visible when the blouse is tucked or layered.
Contact Zhijin