Customization & Sampling
How to Finish Sheer Lace Seams: Binding, Narrow Finishes and French Seams
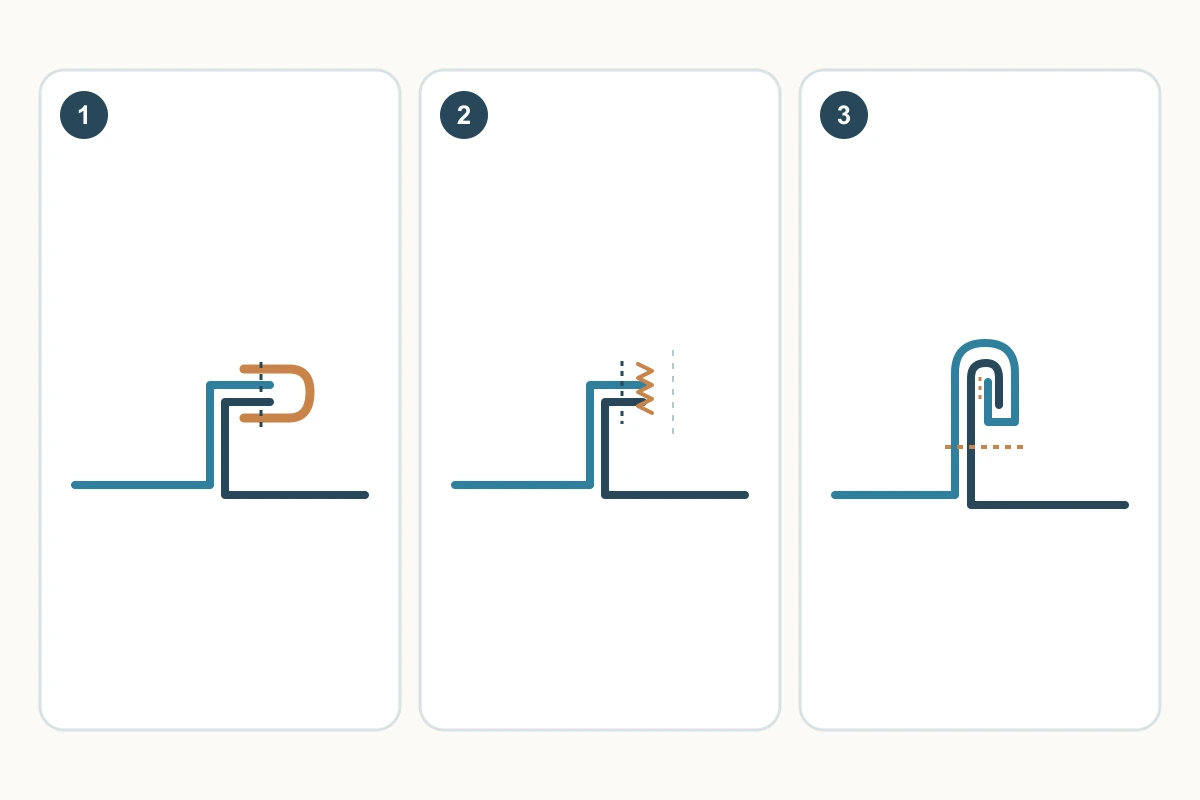
A sheer lace seam is visible from more than one direction: the allowance can show through the face while the reverse touches the wearer. The best finish balances that visible line with the security of the cut edge. Compare three trial constructions before cutting the garment. Start with an undecorated seam area; dense beads, sequins or a very open unsupported structure need their own construction review.
1. Read the seam before choosing its finish
Mark the garment seam line, the available allowance and the direction in which the finished seam will lie. Separate a seam joining two panels from an exposed outer hem. An edge finish protects the allowance, but does not replace the joining seam or correct a panel cut to the wrong line.
Place two actual lace offcuts over the intended lining or skin-tone reference. Note where the motif is dense enough to support stitching, whether cut threads loosen, and how much the seam must move. Keep a spare unsewn piece for comparison. Record the seam location, since a straight side seam and a sharply curved junction may need different solutions.
2. Compare the finished line and the inside
Make the alternatives to the same seam line with the same background. Do not judge transparency by laying an unfinished allowance on a white table alone. A neat enclosed edge may still create a conspicuous band when several layers overlap; a very narrow finish may leave insufficient structure to hold its stitches.
| Finish | What it controls | Trade-off to compare |
|---|---|---|
| Separate binding | Covers the cut allowance edge | Added strip, colour shadow and intersection bulk |
| Narrow stitched finish | Secures a small supported allowance | Less coverage; risk of tunnelling or missed openings |
| French seam | Encloses the cut edges within the seam | Extra folds, darker ridge and suitability to the seam shape |
3. Trial separate binding around the allowances
Sew the joining seam, then enclose the chosen allowance edge or pair of edges with a suitable lightweight binding. Baste to make sure the wrapping catches the whole cut edge, and stitch without stretching the lace. The binding width and folding arrangement should be selected on the trial rather than copied from an unrelated garment.
Open the sample over its actual background and inspect both the binding colour and its shadow. Check that the inner fold is caught along the full length and that the binding does not twist the lace panel. Where another seam crosses it, make that intersection as well; a flat short sample can hide the bulk of a complete junction.
Technical references
4. Trial a narrow stitched finish
For a low-strain detail whose structure supports it, sew the joining seam first and test a narrow zigzag close to that seam, then cautiously trim the excess beside the secured edge. The straight seam joins the panels; the added edge stitching controls the allowance. Inspect the result before reducing the allowance further. Do not adopt this heavily trimmed finish for a load-bearing garment seam merely because it looks finer.
Check whether the zigzag catches connected lace or simply bridges gaps. If it tunnels, draws the edge into a cord or leaves cut threads escaping, revise the trial. Making the finish narrower is not an improvement if it removes the material holding the seam. Use small cuts with the supporting panel clearly separated from the scissors.
Technical references
5. Use a French seam only where the layers cooperate
A French seam first joins wrong sides together, then encloses the trimmed cut edges inside a second seam with right sides together. Trial it where the lace is fine and manageable enough to fold cleanly. The enclosure can produce a darker ridge in transparency, so an attractive result on plain sheer fabric does not settle its appearance on patterned lace.
For a hypothetical 10 mm total allowance, a first seam 4 mm from the cut edge and a second seam 6 mm from the folded first seam use 4 + 6 = 10 mm. Trimming the first allowance to 2 mm leaves it inside that enclosure. These figures illustrate the geometry only; verify containment, fraying and the pattern line before adopting any dimensions.
Technical references
6. Approve the assembled seam sample
Compare the face, reverse, hanging shape and intended movement after every finish is complete. Look for dark bands, rough cut ends, distorted motifs and bulky intersections. Check whether any temporary support remains visible. Label each result with its material, thread, stitch, seam position and actual finished allowance.
If none of the trials balances appearance and security, revisit the seam position, panel layout or support layer before cutting the garment. Keep the selected sample and photographs as the construction reference. An offcut assessment can guide the choice, while any required wear or care evaluation belongs to the complete garment and its intended use.
Discuss your embroidery project
For an All4Lace fabric enquiry, share the lace reference, intended seam location and photos of your preferred finish over the actual background, including the reverse and a seam intersection.
Contact Zhijin