Customization & Sampling
How to Gather Lace Trim: Choose a Method and Calculate the Working Length
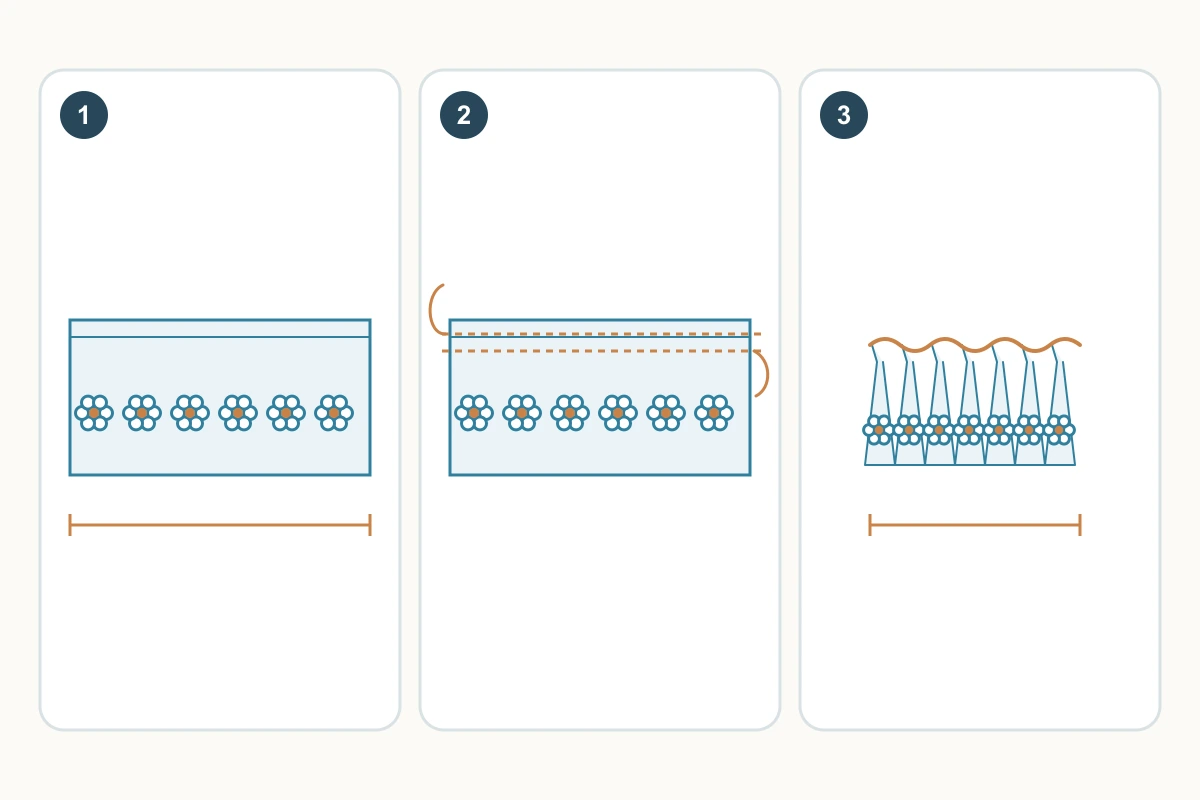
Gather lace by drawing a usable attachment heading into a shorter length, then fixing that heading to its receiving edge. Start with a soft trim whose heading can carry the stitches. For a first measured sample, hand gathering or removable machine basting gives you control of the length; a cord method is another option when it can fit securely. A gathering or ruffler foot needs its own material trial before repetition. The fullness ratio describes the sample you chose, not a setting that suits every lace.
1. Choose by the heading, not by batch size alone
Fold a spare length gently by hand. If the heading tears, the motifs stack into a stiff block, or decoration obstructs the attachment line, stop before machine gathering. Try a less full design, a different trim or another attachment construction. A single loose connecting thread is not a secure gathering path.
For hand gathering, run a removable line through connected heading material, leave free tails, hold one end against slipping out and slide small sections along that gathering thread. Add a parallel line only if the heading has room and the extra punctures cause no damage. For machine basting, use removable long stitches with free tails and draw up the bobbin thread while keeping the opposite end from pulling out. For cord gathering, zigzag over a removable cord without piercing it; hold one cord end against slipping out, pull the other cord end and slide the lace along the cord, not along the zigzag sewing thread. Each method still needs an intact path for its stitches.
| Method | Useful first candidate when | Limit to check |
|---|---|---|
| Hand gathering | Short or awkward areas need frequent manual control | Thread must not cut the heading; control does not guarantee speed or strength |
| Machine basting | Heading feeds without damage and temporary rows fit | Loose openwork can miss stitches; extra rows may leave holes |
| Zigzag over cord | Heading has space for the zigzag and a sliding cord | Needle must miss the cord; removal must not disturb the seam |
| Gathering or ruffler foot | A compatible machine and repeatable trial have been established | Actual input/output length and fold shape must be measured; foot numbers are not universal ratios |
Technical references
2. Calculate the gathered working length separately from the ends
Let F be the finished receiving length between the end-treatment marks, and L the flat heading length actually gathered. The trial ratio is r = L ÷ F, so L = F × r. Measure both along the attachment heading; the free scalloped edge travels farther once it waves and is not the length reference.
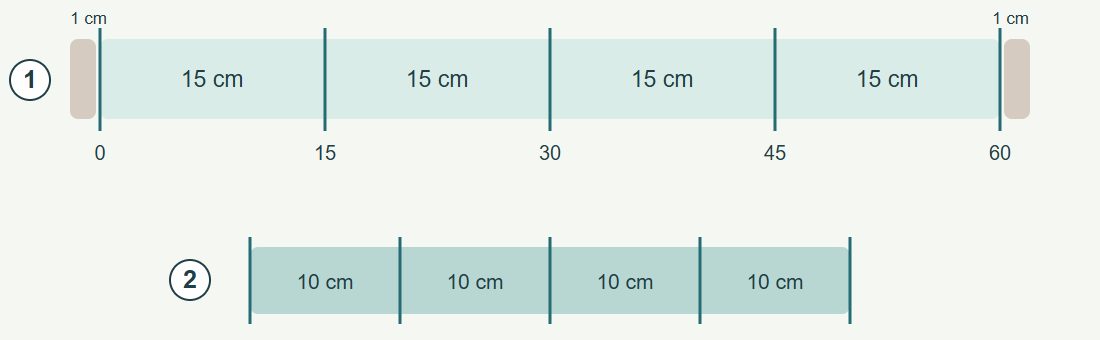
Hypothetical layout: F = 40 cm and r = 1.5 give L = 60 cm. Assume this construction separately needs 1 cm at each end: the cut length is 62 cm. The two end additions stay outside the 60 cm working segment and are not drawn into its gathers. These dimensions are examples, not recommended fullness or allowances. If motif matching requires additional length, plan it separately before cutting.
3. Separate the temporary gathering rows from the permanent seam
Mark the permanent attachment line first. On a heading wide enough to hide both rows in the finished seam allowance, place two parallel temporary rows there, away from the free decorative area. On a narrow heading that cannot accommodate them, compare a single row, hand method or supported construction. Do not add a row in open mesh simply to obtain two rows.
Keep temporary stitches removable and their ends unlocked while forming the gathers. The final seam must catch the heading and receiving fabric independently of any temporary thread that will come out. Leave room to remove that thread without cutting the permanent seam. Where the final design has no concealed allowance, test the temporary line and removal marks on a spare piece before choosing its exact path. Do not transfer a garment tutorial’s multiple rows across a seam line directly to fragile lace.
Technical references
4. Match quarters, then adjust folds within each quarter
Mark equal divisions on the working segment and on the receiving edge before gathering. In the assumed 60-to-40 cm trial, the flat heading marks are 0, 15, 30, 45 and 60 cm, paired with receiving marks 0, 10, 20, 30 and 40 cm. Do not include the 1 cm end additions. Match these points, then slide the small folds within each section instead of moving all the fullness to one end.
Draw up the hand-gathering thread, machine-basting bobbin thread or gathering cord, according to the method selected. Keep the opposite end from slipping out and keep both ends accessible. For the cord method, do not pull the zigzag sewing thread. Secure the working ends temporarily when the formed heading reaches F, then recheck the relaxed length between the end marks. The receiving edge stays at its intended length; stretching it to fit an overlong ruffle hides an error that reappears when the assembly relaxes. If the opening must stretch in use, a separate complete-seam movement trial is needed.
5. Stop and correct the specific failure
Work on spare pieces and keep the reference marks. A broken thread does not require cutting the whole garment edge: release the affected section, re-baste through intact material and restore its two end marks before redistributing. If the heading itself is cut or torn, replace that trial; stronger thread will not repair lost structure.
| What happens | Next action | Recheck before continuing |
|---|---|---|
| Thread will not slide | Check for locked ends, tangled tails or a needle-pierced cord; release the obstruction | Thread slides without dragging or damaging the heading |
| Thread breaks repeatedly | Use shorter controlled sections and review thread/needle compatibility; compare another method | No damaged heading and the intended length is reached |
| Heading tears or keeps enlarged holes | Stop using that row placement or method; trial another heading or trim | Connected material remains intact after forming and removal |
| Dense motifs collide or the outer edge twists | Reduce the trial working length at the same F, or choose a more flexible trim | Fullness is acceptable when hanging, not only pushed flat |
| Gathers cluster at one end | Restore quarter marks and redistribute inside each section | Each 15 cm flat section fits its assumed 10 cm receiving section |
| Presser foot sweeps fine gathers into a pleat | Stop, re-baste that section and improve visibility/control of the folds | No local pleat and no stretched receiving edge |
6. Fix the heading and keep a repeatable sample
Baste the formed heading to the receiving edge in the chosen orientation. The permanent attachment must sew through the receiving fabric and the gathered heading layers distributed along that line: those folds are the material that needs fixing, so do not push them away from the needle path. Move only the free decorative edge or accidentally tucked-under material clear of the line. Guide the gathers so the foot does not sweep them forward into one large pleat. Finish the inside and the two ends as planned, then remove only the temporary threads or cord designated for removal without cutting the permanent seam. With those temporary materials out, check each marked section: the permanent stitches must still catch its gathered heading layers and hold its fullness in place. Inspect for missed areas, released folds, damaged stitches and visible holes; repair or repeat the affected trial if any section depends on the removed thread or cord.
Measure the relaxed heading again, then view the ruffle lying down and hanging freely. Compare two labelled trials with the same lace, F and attachment construction but different L if the first is too dense or too sparse. Record the chosen L, F, end additions, method, temporary and permanent paths, machine/needle/thread and treatment result.
For an attachment, make a marked calibration piece with the actual material: measure the flat input between marks and the relaxed gathered output between the same marks, then calculate r. Repeat after a material or setting change. A foot can create repeatable movement but does not establish a finished ratio from a dial alone. This guide has not tested a specific trim or accessory.
Discuss your embroidery project
For an All4Lace ruffle enquiry, share the trim reference, finished receiving length, proposed end finish and labelled photos of the flat and gathered trials. Include whether the receiving edge must remain stable or stretch.
Contact Zhijin