Customization & Sampling
Sewing Darts in Lace: Preserve Shape Before Hiding the Seam
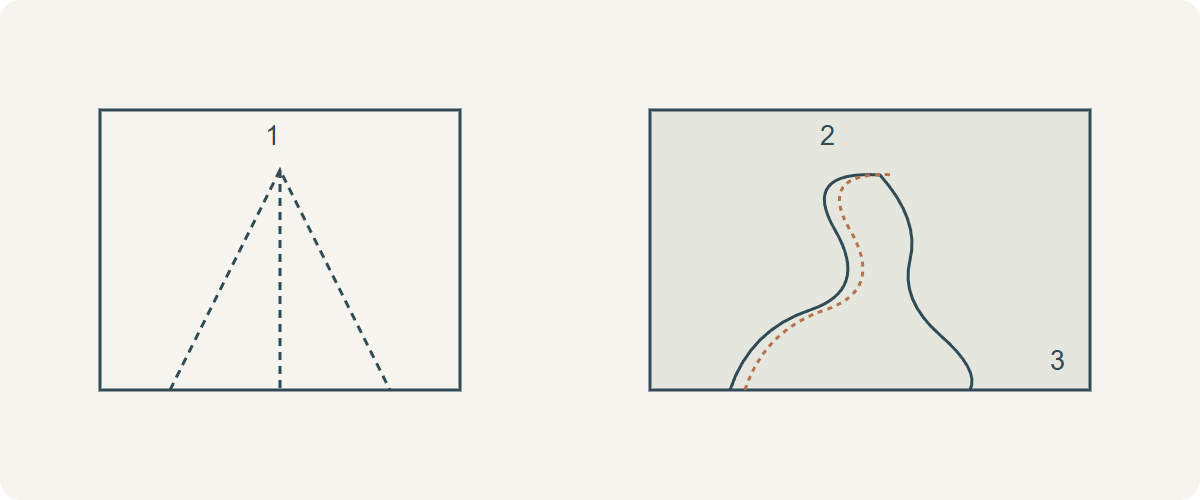
A lace dart must remove the pattern’s intended fullness even when its seam is hidden in a flower. Fine allover lace can be sewn with an underlining as a conventional dart; some connected motifs allow an overlapped dart secured along their edges. Fit the shaping first, verify where every permanent stitch will catch material, and trim only after that supported trial works. An attractive overlap is not a safe substitute for a load-bearing seam.
Establish the dart on the fitted pattern
Finish the fit in a suitable toile before choosing the lace treatment. Transfer the two dart legs, point, centre fold and nearby reference lines without distorting the ground. Mark the seamline rather than relying only on the cutting edge. If the dart must move to preserve a flower, have the patternmaker rotate or redistribute it while preserving the required shaping; do not simply move one leg on the fabric.
Consider where stress will occur when the wearer sits, reaches or fastens the garment. A decorative overlap on a supported skirt is a different case from an unlined close-fitting bodice. Trace that force into the seams and support layer. If there is no coherent carrying structure, choose a supported conventional construction or revise the design before making irreversible cuts.
Choose the treatment by actual lace structure
Threads presents both underlined darts and motif-overlapped darts. These are alternatives for different structures, not interchangeable finishes. A lightweight allover net may have too little connected motif to create a reliable cut-and-overlap route. In that case, retain the net and consider sewing it with a compatible underlining, provided the visible folded allowance and movement are acceptable.
For motif lapping, identify a connected, stitchable leading edge covering the intended overlap. Examine its entire route, including the narrowing region near the point. A line that reaches an unsupported hole is not completed by drawing it through the hole. Add a designed permanent support or choose another route; otherwise reject the method for that sample.
| Construction | Useful first candidate | Reason to reject |
|---|---|---|
| Fine allover lace with underlining | Conventional dart through compatible layers | Visible fold too dark or joined layers distort |
| Connected motifs on supported area | Motif overlap with full permanent edge path | Path crosses holes or removes carrying connections |
| Highly stressed sheer area | Redesign support and fit first | Decoration alone must carry garment tension |
Technical references
Trial a conventional dart without crushing the surface
Baste lace and underlining together in the relaxed state, aligning both dart legs on the folded piece. Sew from the wider end towards the point with a suitable needle, thread and settings established on the same stack. Approach the fold gradually rather than creating a blunt corner. Secure the finishing thread tails using a method that does not leave a hard lump; do not repeatedly backstitch into a delicate point.
Inspect the point on a shaped support before pressing. Test the permitted heat and pressure on spare lace with its decoration; steam and a hard press are not automatically safe. If the allowance is visible, compare directing it differently or using a less conspicuous underlayer. Do not cut it away merely because a dark triangle can be seen through the lace.
Build a motif overlap on a supported trial
Susan Khalje’s original lace tutorial limits one motif-overlap example to darts not under stress. Preserve that condition. On an expendable full dart sample, transfer the fitted markings, plan a leading motif edge beside the geometric leg and retain enough underlap for a secure connection. Open only along the planned route, bring the original dart references into their shaped relationship and baste without flattening the intended volume.
Permanently hand-secure the selected motif edge through connected upper and underlying material, taking small controlled stitches along the full path. Where a support layer is part of the construction, confirm its planned capture rather than assuming hidden stitches reach it. Inspect front, reverse and point with basting removed before trimming surplus. Do not cut retained anchoring threads or reduce the underlap beyond the successful trial.
Technical references
Check shaping, not just a hidden line
Hypothetical example: a waist dart has 24 mm intake at the seamline and ends at the fitted point. A proposed flower overlap hides the line but closes only 16 mm at that seamline. The missing 8 mm remains unwanted circumference. This arithmetic is a paper illustration, not a specification for a person or a material. Keep the 24 mm shaping or have the patternmaker intentionally redistribute the difference.
If the dart point puckers, distinguish excess fit, a sudden stitch taper, dragged layers and a stiff motif crossing the apex. Recheck the toile and compare a fresh trial with only one construction change. If the motif has to be severed into weak fragments to achieve the shape, reject that route and select a different placement or material rather than adding more stitches over damage.
Approve the complete supported area
Examine the sample in the intended worn position and through the specified underlayer, with the seam free of temporary help. Include the adjacent waist or side seam if it anchors the dart. Check movement, point shape, loose edges, visibility and any permitted care. Save the marked pattern, stitch path and photographs together; the fact that another lace has the same floral name does not transfer this approval.
Discuss your embroidery project
For an All4Lace lace sample request, include the dart location, pattern revision, underlayer and the amount of motif coverage needed around it. A larger sample crossing the entire dart is more useful than an isolated flower.
Contact Zhijin