Materials & Applications
Centre-Hole vs Edge-Hole Sequins: Movement, Fixing and Coverage
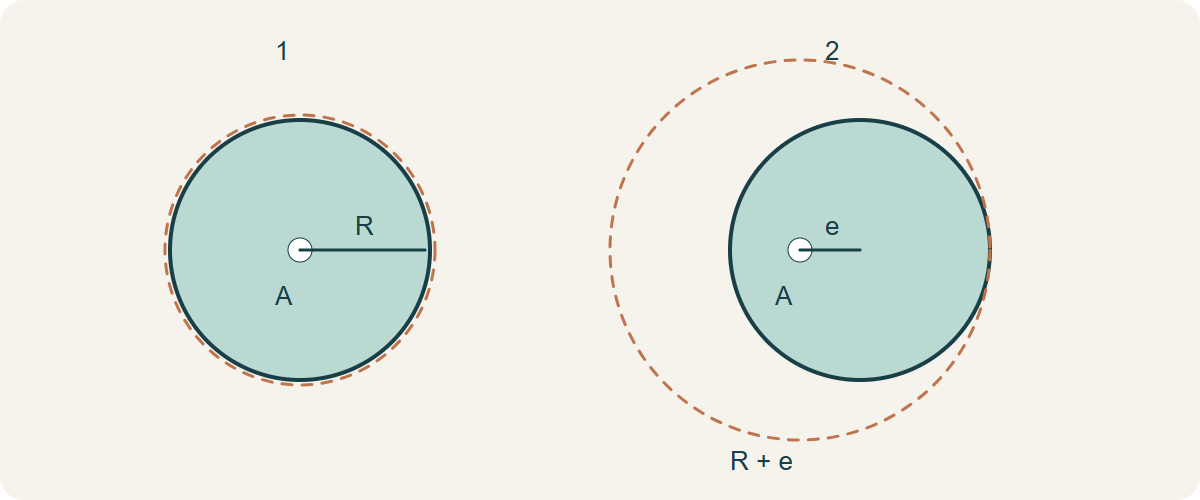
A centre hole places the fixing point near the middle of a sequin; an edge hole moves it towards the perimeter. That changes the possible movement around the anchor and the way neighbours overlap. Neither hole position alone guarantees flatness, reversibility or secure attachment. Choose the intended motion first, then approve the complete sequin, fixing thread and ground as a stitched sample.
1. Describe the hole, not just the product name
Suppliers may use side-hole, top-hole, offset-hole or hanging sequin for overlapping categories. Request an outline drawing with the hole centre, hole diameter, outer dimensions and intended face identified. A hole close to the edge is not the same as a second hole added to a centre-hole shape. A photograph without a scale cannot establish clearance for the chosen needle and thread.
A sequin manufacturer publicly lists both centre and side holes, while Wilcom documents custom outlines and offset holes separately from fixing stitches. These are distinct design variables. Keep the supplier article number attached to the drawing; the generic name can stay the same after the outline or hole changes, yet the previous stitch path may no longer fit.
Technical references
2. Compare the movement envelope
Imagine the thread-supported hole as a pivot, not as proof that the sequin must rotate freely. A centred circular disc has the same outside reach in every direction. An offset disc can sweep farther to one side of its anchor when it turns. Thread geometry, overlapping neighbours, backing contact and any additional fixing can restrict that movement. Specify whether the design should hang, lift slightly, flip deliberately or stay restrained.
Hypothetical geometry: a 10 mm circular disc with its hole exactly centred reaches 5 mm from the anchor. Move the hole centre 3 mm from the disc centre and the farthest edge is 8 mm from the anchor. This 8 mm radius is a conservative planar sweep envelope if full rotation were possible, not a measured motion in cloth. Hole size, thread and three-dimensional tilt remain outside this calculation.
3. Let the fixing path control the intended result
For a suspended effect, the maker must establish a thread path that carries the sequin through the designated hole and anchors into supported ground without accidentally sewing down its moving edge. For a restrained effect, additional thread legs may limit rotation. Those legs must reach reliable material and avoid cutting across sharp edges. There is no universal number of stitches that secures every hole, film and net combination.
Do not adapt a machine file by shifting only the displayed circle. The feed device, hole definition, machine format and fixing path need compatible settings. A screen preview cannot show whether the actual needle catches film, whether a link between sequins is cut correctly or whether the net distorts. Have the operator run a short trial with the intended device, then examine the front and reverse after removing temporary support designated for removal.
Technical references
4. Compare like for like in a small panel
Hold film, finish, outer size and ground constant where possible. Make one centred-hole and one edge-hole panel with the maker’s appropriate fixing for each; identical stitch settings are not necessarily a fair comparison when the geometry differs. Photograph each upright and lying relaxed, using the same direction of light. Label any variables that could not be held constant before comparing brightness or movement.
| Design need | What to inspect | Reason to revise |
|---|---|---|
| Controlled flat coverage | Edge lift, rotation and fixing visibility | Film buckles or thread pulls the ground |
| Hanging movement | Clear space below anchor and contact with neighbours | Moving edge is trapped or snags adjacent layers |
| Intentional flip effect | Return behaviour and two-face appearance | It changes face unpredictably in the approved use |
5. Lay out anchors and moving edges separately
Anchor spacing is the distance between fixing points; visible gap is the space between sequin outlines in a particular position. They are not interchangeable. Map both on the panel, including the garment seam and the reverse-side backing. A row can look evenly filled when flat yet show narrow gaps or collide when hanging. Evaluate the arrangement in the orientation in which the garment will be worn.
Keep active seam, zipper and folded-edge paths clear of the full intended movement envelope, not merely the resting outline. If a moving edge reaches an opening, revise placement or have that zone made without the moving embellishment. Removing a sequin after cutting may release a chain of attachments, so the sample plan must include securing interrupted runs rather than just clipping the visible disc.
6. Read failures by location
If only the edge-hole panel turns into the seam, first revisit orientation and anchor clearance. If both panels pull holes in the ground, investigate support and load distribution rather than blaming hole position. A rough hole edge and abraded thread call for component examination. Keep the failed specimen intact, record where the first damage occurred and change one variable in the next trial; pulling harder by hand does not establish a calibrated strength result.
Check the finished assembly through the agreed movement and care trial. Record loss, breakage, persistent flipping, scratchy contact and any catching of adjacent lace. A result from an undecorated base or a loose sequin does not approve the stitched combination. If the relevant laboratory cannot mount the embellished specimen in its normal method, agree a documented alternative rather than silently omitting the decoration from the test.
7. Questions to resolve before ordering
Does an edge hole always mean reversible sequins? No: a two-face flip design also requires suitable surfaces, spacing and attachment. Does a centre hole ensure a sequin lies flat? No: an incompatible stitch path or curved outline can lift it. Can hole position be changed after sample approval? Treat the change as a new component version and repeat the relevant fixing and clearance trials.
Retain a finished panel, a loose component reference and a drawing tied to the same revision. Together they distinguish an outline mistake from a stitching mistake in a later submission. If movement matters, add a short repeatable handling description and a video of the accepted behaviour; the video supplements the physical sample and must not be used to hide damage on the reverse.
Discuss your embroidery project
Send All4Lace the intended hanging or restrained effect, sequin outline and hole sketch, ground reference and a photograph showing seam clearance. Ask for a stitched comparison rather than approving hole position from a catalogue name.
Contact Zhijin