Customization & Sampling
Cutting Directional Sequin Fabric: Keep Grain, Handedness and Light Consistent
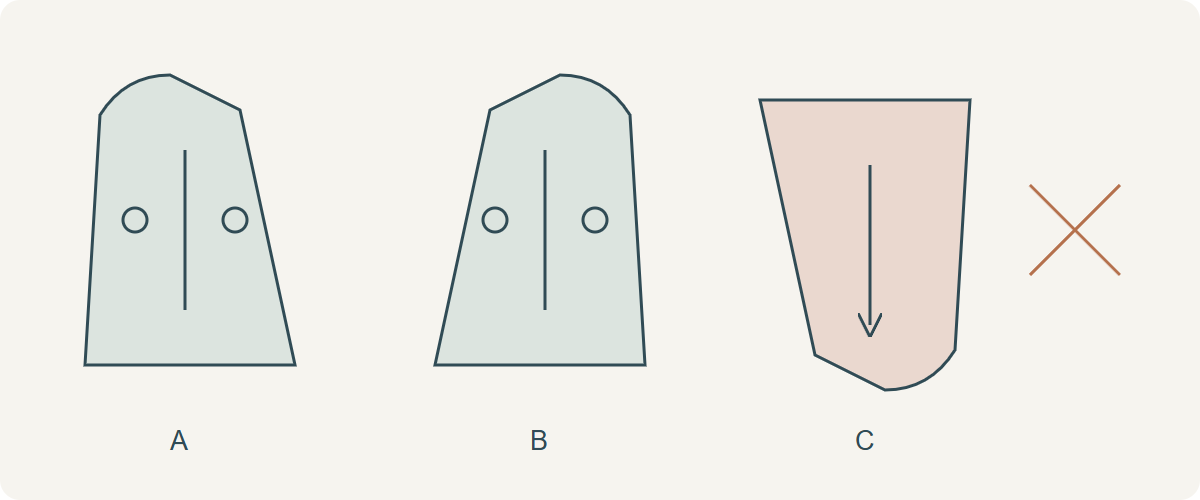
Cut directional sequin fabric one layer at a time, keeping every piece’s approved top direction relative to both the ground and the sequin effect. To obtain a left/right pair, flip the paper pattern’s face while retaining its top arrow; do not turn one fabric piece upside down just to save space. Determine the preferred direction from the actual worn lighting trial. “All sequins must point down” is not a universal rule for every construction.
Map three different directions
Label the ground’s verified structural axis G, the panel’s worn top T and any preferred sequin lay S. Add a motif arrow if the decoration forms a directional flower or stripe. Some fabrics have overlapping plates; others use scattered flat discs or freely moving paillettes. Inspect an actual sample on both faces rather than inferring the construction from the word sequin.
Mood’s original tutorial and Sew Essential’s project both use single-layer handling and consistent direction where a nap is present. Their examples do not establish the best direction for every cloth. A two-tone flip surface can change with hand movement while the ground remains unchanged. Record its intended reset state as well as the panel orientation so a partially brushed sample is not mistaken for a cutting defect.
Choose direction under the relevant light
Use two comparable sample panels with their backs labelled. Keep both faces outward and rotate one by 180° on the same support, under one unchanged light. Photograph them together rather than comparing separately corrected images. Then place them in the intended worn orientation and drape. A flat overhead photograph can miss a difference visible when a sleeve curves beside a bodice.
Where stage light, flash or a moving garment matters, include the actual relevant viewing condition with the designer. Do not promise every light will match because one diffuse image does. If an approved effect requires all panels one way, write that rule on the marker and cut tickets, with an identified retained reference. “Looks the same” without a viewing state is difficult to reproduce.
Flip paper for handed pieces; do not invert the fabric rule
Prepare full single-layer paper pieces, including the complete shape of any half pattern marked cut on fold. Mark the top, face orientation, piece name, quantity and left/right side. Place the first sleeve with its top arrow following T. Turn the paper face over for the opposite sleeve, keep its top arrow following T again, and verify the notches produce opposite hands.
Rotating a sleeve shape by 180° keeps the same paper face but points its top the other way. That is not the same operation as mirroring. Inspect the whole marker before cutting and photograph the arrowed layout. With asymmetrical designs, also confirm whether the garment intentionally needs dissimilar left and right panels; a geometric mirror alone cannot decide the designer’s motif arrangement.
Technical references
Prepare the cut boundary without releasing adjacent decoration
Support the full panel weight on the table, lay the ground relaxed and use suitable weights or tested marking/basting that does not snag decoration. Work from the reverse where it makes the ground and cutting outline clearer, but keep face and direction labels visible. Pins must pass through suitable material rather than hard plates. Preserve alignment marks with tested removable marks or thread tacks if cut notches would damage a decorated boundary.
Before clearing sequins from a cutting or seam corridor, identify whether they are individually attached, share an embroidery run, or are glued. Secure the retained thread ends when a shared run must be interrupted. Remove only the planned amount on a spare trial and inspect neighbouring plates for release. Do not pull a row loose or assume adhesive can be peeled away without ground damage.
Cut a labelled single layer and keep paired pieces together
Use a suitable cutting tool that can handle the ground and any remaining decoration, protecting the work surface and controlling loose pieces. Avoid cutting through hard plates where the chosen preparation can instead clear the boundary; if fragments may fly, use appropriate eye protection. Keep discarded sequins out of machinery. Do not send sequins through an overlocker knife or sew directly through them merely because a general tutorial proposes a stronger needle.
Keep each piece’s reverse label through handling and bundle left and right counterparts with the same orientation record. Check all quantities against the marker before discarding offcuts. Offcuts may provide spare matching decoration, but they need a material identity and direction if retained for repairs. Protect the surface during stacking so brushing does not partially reverse a flip-sequin state.
What to do when one sleeve looks darker
Hypothetical example: sleeve A follows the approved arrow, while B was inverted on the marker to use a gap. Under the agreed light, B looks darker. First place both sleeves in the same worn orientation and reset any reversible surface consistently. Confirm lot and face, then compare the arrow record. If the inverted orientation remains the cause and the design requires a matching pair, recut B with the correct hand and top direction from suitable material.
Do not conceal a permanent direction difference by editing product photographs or coating the fabric. If there is insufficient correctly oriented material, stop and discuss a deliberate design change or new cut length. If arrows match but the panels still differ, investigate lot, surface state and the light angle before blaming cutting direction.
| Check | Record | Reject assumption |
|---|---|---|
| Ground | Structural/movement direction | Sequin row equals grain |
| Light effect | Same-frame chosen condition | Every direction always looks identical |
| Handedness | Paper face plus top arrow | 180° rotation creates the other hand |
| Decoration clearance | Retained anchors and complete corridor | Unpicking one plate affects only that plate |
Discuss your embroidery project
For an All4Lace sequin enquiry, send one-frame direction comparisons, the pattern grain and top arrows, and whether the effect is reversible. Request a sample large enough to judge both panel pairing and the intended light.
Contact Zhijin