Sourcing & Orders
How Much Lace Fabric Do You Need? Calculate from the Actual Layout
The reliable amount of lace is the length of an accepted layout on its actual usable width, plus separately justified additions for joins, matching, sampling and delivery conditions. A dress-style yardage table is only an early budget guide. Build the full size and quantity of every cut piece, including left and right sides, onto a scaled marker; then enforce grain, motif direction and border placement before measuring length.
List complete cut pieces before doing arithmetic
List the pattern revision, garment size, quantity of each piece, intended face and any left/right requirement. A half-front marked “cut on fold” is not half the material of a full front. For single-layer placement, unfold or mirror that paper shape into a complete template. Include seam and hem allowances unless the submitted pattern already includes them, and state which case applies so they are neither omitted nor counted twice.
Sew Daily’s basic layout guidance explains grainlines, cutting quantities and fold pieces. Those basics remain necessary under lace decoration. A bounding rectangle is useful for a conservative first estimate, but a real curved pattern may nest differently. Do not send only the garment’s finished bust or hem circumference and expect it to describe the cutting area.
Technical references
Use the actual usable width, not a nominal label
Confirm the width across which complete specified pieces can be cut, excluding unusable edges and any boundary the supplier has declared. A decorative scallop may be usable for a hem but unavailable inside a plain full-width panel. Record total width, usable body width and available border runs separately. Do not assume every bridal lace is 150 cm or 59 inches wide.
BERNINA’s woven-grain guidance explains checking parallel placement from both ends of a grainline. Use that discipline where the ground is woven; for knit or net follow its confirmed structure and movement requirement. A piece that only fits by an unapproved rotation does not fit the accepted marker. Keep the orientation fixed while comparing width options.
Technical references
Apply motifs and borders before nesting pieces
Mark the material’s lengthwise repeat and crosswise repeat with a recognisable origin. For each piece, mark the critical garment position where a flower, clear area or scallop must land. Keep mirror requirements separate from a 180° rotation: turning a piece upside down may save space while violating one-way motifs. A left/right pair may require turning the paper face over while keeping its top arrow in the approved direction.
When a hem must follow a scalloped roll edge, place that hem first and check whether the piece’s required depth fits across the remaining usable width. Two scalloped edges do not automatically provide interchangeable border lengths; check direction, matching motif and whether cutting one piece consumes ground needed by another. Build the real competition for space into one layout.
A worked marker with explicit assumptions
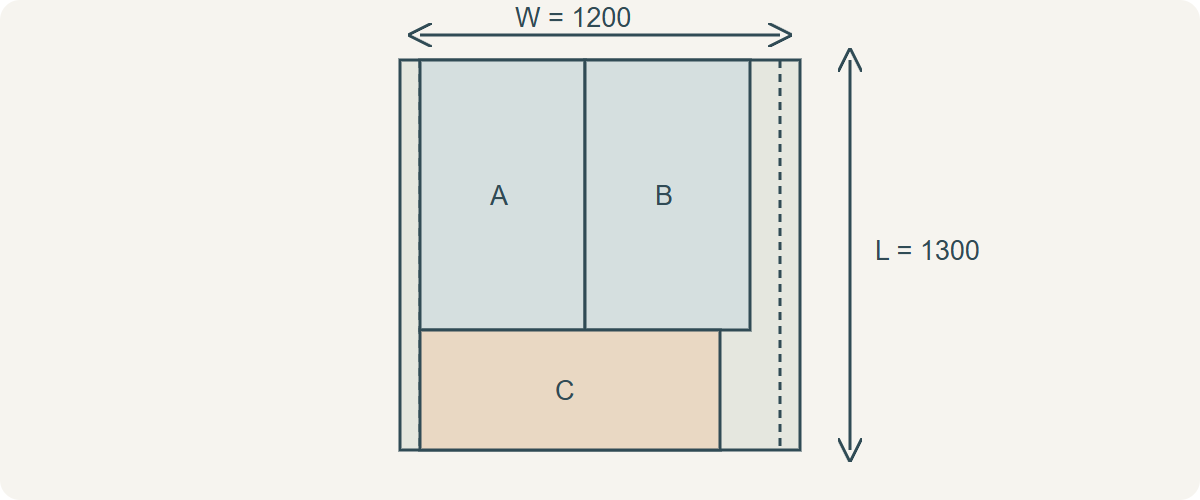
Consider three hypothetical full cutting envelopes that already include every construction allowance: A and B are each 550 mm wide by 900 mm long; C is 1000 mm wide by 400 mm long. The usable width is 1200 mm. All pieces must run one way, but there is no motif matching or scalloped-edge restriction in this simplified case. Place A and B side by side: 550 + 550 = 1100 mm, which fits the width. Put C in the next 400 mm length.
The accepted example marker length is 900 + 400 = 1300 mm, or 1.30 m. Its usable rectangular area is 1200 × 1300 = 1,560,000 mm². The three cutting envelopes total 2 × 550 × 900 + 1000 × 400 = 1,390,000 mm², approximately 89.1% of that rectangle. This is a geometric utilisation calculation, not measured cutting waste and not a production yield guarantee.
Now reduce usable width to 1050 mm while retaining the same orientations and these rectangular envelopes. A and B cannot share a 900 mm row because 1100 mm exceeds 1050 mm. Their two rows plus C use 900 + 900 + 400 = 2200 mm in this simple layout. Price per metre alone would conceal that change. Real pattern nesting, border placement or a different width needs its own marker, not this result reused.
Itemise additions instead of applying a magic percentage
Add material for a named sampling plan, required seam or end-treatment trials, specific repeat matching and any agreed roll-end or quality allowance. If pattern matching has already been included in the marker length, do not add it again. If dimensional change affects the cutting state, establish the preparation and measurement basis with the garment team; a generic shrinkage percentage cannot repair an undefined process.
For multiple sizes or garments, make a combined marker where appropriate rather than multiplying a small sample’s efficiency. Smaller pieces may fit between larger ones, but matching and one-way rules can prevent nesting. Keep lining, support and trim requirements on separate material calculations: their widths and routes differ from the lace.
| Line item | Record | Avoid |
|---|---|---|
| Accepted marker | Width, piece list, length and orientation | Area divided by width alone |
| Matching | Included in marker or additional named length | Counting both |
| Sampling | Named trial pieces and quantities | Unexplained contingency |
| Order conversion | Supply unit and usable delivery conditions | Confusing metres, pieces and border runs |
Keep the marker with the accepted sample
Save the material reference and lot if known, width and repeat measurements, pattern revision, scale, handed-piece count and agreed additions. Confirm that a PDF prints at its stated scale before measuring it. Recalculate if width, border position, size mix or motif changes. A material order can be discussed from a documented estimate, but bulk cutting should follow the approved full layout and actual delivered material.
Discuss your embroidery project
For an All4Lace quantity enquiry, send the approved full-piece layout or pattern dimensions, size breakdown, usable-width and border requirements, plus the desired sampling allowance. Ask for the actual current fabric width and repeat before converting the marker into an order.
Contact Zhijin