Materials & Applications
Lace Insets for Denim: Opening Shapes, Contrast and Junction Samples
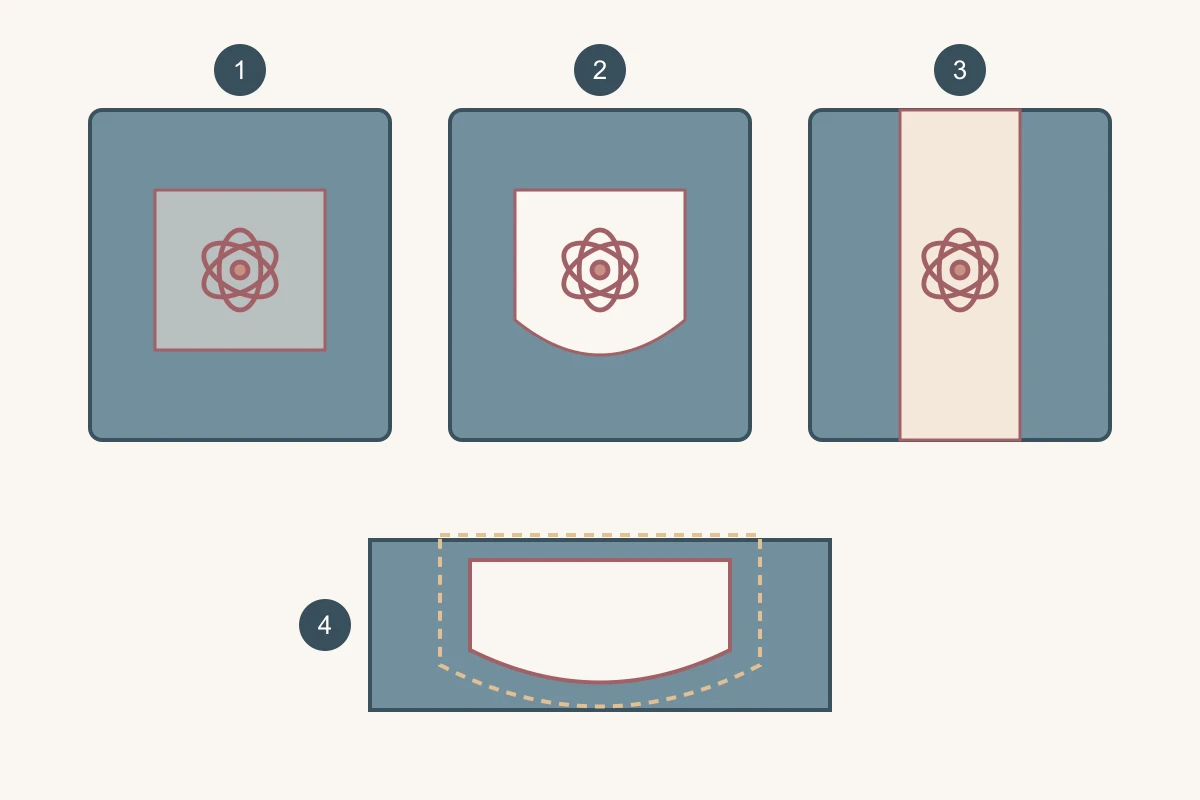
For a lace inset in denim, first decide whether the denim stays behind the lace or an opening is created for it. That choice determines the visible background, edge treatment and amount of exposed lace. Work with the actual denim and the proposed insert together, using a small junction sample before developing the garment. All4Lace’s role here is discussion of decorative textile materials, not supply of finished denim clothing.
Name the construction you want
An overlay leaves the denim underneath; a window exposes lace through an opening; an inserted panel occupies a planned part of the garment. These can look similar in a front photograph but have different inner views. The lace-insertion reference from Closet Core distinguishes insertion from decoration confined to a garment edge and shows the importance of planning placement.
Label your own drawing with the chosen arrangement. Show which layers remain behind the lace and whether the insert reaches a panel seam. For an existing garment, map pockets, seam allowances and hardware before positioning the design; the visible front surface alone does not reveal everything behind the proposed opening.
Technical references
Draw the visible opening and the attachment boundary
Draw the finished visible opening separately from the boundary used to attach the lace. Mark corners, curves and narrow points. A large flower fitted into the outer outline may still be hidden at a folded edge or divided by the chosen attachment line. Place the actual motif over both outlines to see that difference.
Keep a complete piece of denim available for the trial rather than cutting the final garment immediately. A rounded opening and a sharp-cornered opening can be compared as alternative shapes with the same lace motif. Select the visual result and construction together; an appealing paper silhouette is only the first part of that choice.
Pair the actual denim with the lace
Use the intended denim colour, finish and thickness in the pairing. Place the lace over it and then over the planned opening or inner layer. White lace on indigo denim with the denim retained is a different visual arrangement from white lace over an open window. Photograph those versions with the same light and background.
Check how the pair bends along the proposed placement and where the join becomes prominent. If the design uses a stretch denim, include the garment’s intended movement in the review rather than choosing lace from colour alone. Discuss cleaning and finishing as a combined-material question with the garment team, using the actual material references.
Build a junction sample that answers a question
A useful junction sample includes the real denim, lace, inner layer if used, and the planned corner or curve. Give the sample a specific purpose. The following three versions separate visual decisions that a loose lace swatch cannot resolve.
| Trial version | Keep constant | Main observation |
|---|---|---|
| Overlay | Denim and lace reference | Contrast with denim still behind |
| Window | Motif and opening position | Visible lace and inner edge |
| Panel join | Actual adjoining materials | Transition across the planned seam |
Compare one denim design in two versions
Imagine a denim shirt front with a lace window above a pocket. Version A has a narrow pointed lower end; version B has a wider rounded end. Keep the lace motif and location constant. On the samples, compare how much of the flower remains visible and how the join looks from inside. This makes the outline, rather than a simultaneous colour change, the variable under review.
If B is chosen, transfer its visible opening and attachment boundary back to the garment drawing. Then review that placement on the assembled shirt front with the pocket in position. Keep the original coupon beside the revised drawing so the chosen edge can be traced. This is an invented planning example, not a completed All4Lace denim project.
Order the decorative material from the selected layout
Once the arrangement is chosen, specify whether the decorative material is needed as a cut length, repeat-based panel or separate trim. Mark the motif direction and usable area around the opening. Quantity planning should include the selected left/right arrangement and layout, rather than multiplying only the visible hole area.
Send the junction drawing with the textile request. Keep the denim and garment construction responsibilities identified separately from the lace material request. That allows the supplier and garment team to work from the same visual plan without confusing a decorative fabric quotation with a finished-denim order.
Discuss your embroidery project
Send All4Lace the denim reference, chosen overlay or inset arrangement, visible opening and attachment outlines, and preferred lace motif. State the required material form and let the garment team provide the junction sample for the selected construction.
Contact Zhijin